什么场景需要加锁

在并发的场景下经常会出现多个请求同时打进服务,导致出现资源抢占的问题,比如库存、匹配的场景。

举个库存的栗子,请求A和请求B同时进行下单操作,导致两个请求在获取库存余量的时候都是原始值,分别进行了库存-1的update操作,
但是最后我们会发现,原本库存应该减2,实际上只减了1,这就是并发带来的读写不一致问题,这时候就需要加锁操作。

悲观锁

悲观锁认为任何时候都会有并发的资源抢占,也可以理解为独占锁,所以在加锁期间别的请求会处于等待中并重复请求该锁是否被释放。

实现方案
  1. 直接通过内存加锁 asyncLock

    这种加锁方式是直接在内存里通过变量控制,将请求的执行回调通过一个key保存在队列(FIFO)里,

比如请求A进来:

  • 如果队列为空,将回调A打进队列,并执行回调A,回调A执行完后会检查该队列中是否存在别的任务,如果存在则会循环调用
  • 如果队列不为空,将回调A打进队列,等待前面的循环调用

直到该队列没有任务了,会通过key删除这个队列

看个简单的demo

1
2
3
4
5
6
7
8
9
10
11
12
13
14
15
16
17
18
19
20
21
22
23
class Queue {
private pending: boolean = false
public list: any[] = []

setPending(val) {
this.pending = val
}

register(fn) {
return new Promise(async (resolve, reject) => {
this.list.push([fn, resolve, reject])
if (!this.pending) await this.execute()
})
}

async execute() {
this.setPending(true)
const [fn, resolve, reject] = this.list.pop()
await fn(resolve, reject)
this.setPending(false)
if (this.list.length) await this.execute()
}
}
1
2
3
4
5
6
7
8
9
10
11
const queue = new Queue()
router.post('/xxx', async ctx => {
const result = await queue.register(async (resolve, reject) => {
await sleep(2000)
resolve()
})
ctx.status = 200
ctx.body = {
data: result,
}
})

这种加锁的方式优点成本比较低,对于并发不高的业务可以使用,但是缺点也很明显

  1. 任务都是串行的,并发多了会造成阻塞
  2. 对于集群服务而言内存是不共享的,多台机器就不能这么玩了
  1. 引入redis锁
    redis加分布式锁方法是通过原子操作实现的,众所周知原子操作是不可分割的,在执行完毕之前不会被任何其它任务或事件中断。

    所以我们在请求A打进来的时候对库存操作的加锁,这样请求B进来会先去读锁是否被释放,等锁释放了再去操作库存,这样就能够避免读写不一样的问题

1
2
3
4
5
6
7
8
9
10
11
12
13
14
15
16
17
18
19
20
21
22
23
24
25
26
27
28
29
30
31
32
33
34
35
36
37
38
39
40
41
42
43
44
45
46
47
48
49
50
51
52
53
54
55
class RedisLock {
private expireTime: number
private lockTimeout: number
private expireUnit: 'PX' | 'EX'
private expireMode: 'NX' | 'XX'
private client: any

constructor(client, options: LockOption = {}) {
if (!client) throw new Error('缺少redis客户端')

this.expireTime = options.expireTime || 2 // 锁的有效期
this.lockTimeout = options.lockTimeout || 5 // 锁超时时间
this.expireUnit = options.expireUnit || 'EX'
this.expireMode = options.expireMode || 'NX'
this.client = client
}

// 加锁
async lock(key, val, expire?) {
const self = this

return (async function retry() {
// 加锁
try {
const result = await self.client.set(key, val, self.expireUnit, expire || self.expireTime, self.expireMode)
if (result === 'OK') {
return true
}

await new Promise(resolve => setTimeout(resolve, 200))

return retry()
} catch (e) {
console.log(e)
}
})()
}

// 解锁
async unlock(key, val) {
const script = "if redis.call('get',KEYS[1]) == ARGV[1] then" +
" return redis.call('del',KEYS[1]) " +
"else" +
" return 0 " +
"end"

try {
const result = await this.client.eval(script, 1, key, val)
return result === 1
} catch (e) {
console.log(e)
return false
}
}
}

上面的代码加锁的时候使用了’NX’,保证锁存在时再有进程进行加锁会执行失败,且解锁过程是需要执行lua脚本进行原子操作
如何使用

1
2
3
4
5
6
const lock = new RedisLock(redis)
router.post('/xxx', async ctx => {
await lock.lock('key', 'val')
await sleep(xxx)
await lock.unlock('key', 'val')
})

使用redis分布式锁的好处是redis读取速度快且能在集群中使用,当然并发量高了也能在使用redis加锁的同时做一层redis缓存提升服务性能。

乐观锁

乐观锁是一种极其乐观的加锁方式,它认为不会出现资源抢占的情况,常见的策略比如CAS(Compare and Swap),在执行写操作前我们记录数据的初始值和预期值,
更新时check一下初始值和数据库当前的值 如果一样就将预期值更新进去,否则就认为是过期请求,再次尝试。

乐观锁的使用成本比较高,因为会出现ABA的情况,库存可能被请求B从3修改成2,又从2修改成3,这样A的原始值和预期值是一样的,就需要在表里增加version标记每次更新的版本。

什么微前端?

这几年微前端还是比较火的概念,旨在将后端微服务的理念应用于浏览器端,
把Web 应用由单一的单体应用转变为多个小型前端应用聚合为一的应用

微前端的价值

场景一

作为项目管理者,我希望降低单体项目的维护成本(子应用拆分场景/在业务系统聚合的同时降低复杂度)

场景二

作为开发,我希望使用在保持老业务代码不动的情况下使用新的技术(子应用技术栈无关/避免全量升级版本)

场景三

作为开发,我希望在不同的项目技术环境中复用相同的代码模块以提升开发效率(微前端模块)

为什么不用iframe

  1. 子项目需要改造,需要提供一组不带导航的功能
  2. iframe嵌入的显示区大小不容易控制,存在一定局限性
  3. URL的记录完全无效,页面刷新不能够被记忆,刷新会返回首页
  4. iframe功能之间的跳转是无效的
  5. iframe的样式显示、兼容性等都具有局限性

通过这篇文章你将了解到

  1. qiankun是怎样运行的
  2. qiankun沙盒是如何实现的
  3. qiankun是通过什么方式获取到子应用入口文件的钩子函数的

官网文档

qiankun运行机制

single-spa

不多讲

HTML-Entry

import-html-entry

qiankun支持通过html直接加载子应用,需要子应用在应用入口处暴露出相应的钩子函数并通过webpack打包成umd格式,
qiankun会在执行子应用js代码时通过magic获取到子应用的钩子函数并执行。

相比于JS-Entry,好处是更加灵活,不需要在主应用声明很多scripts地址,
也不需要担心external库的更新问题,坏处是把解析消耗放在用户端

sandbox

js沙箱

snapShotSandbox

非proxy沙箱用于兼容不支持proxy的浏览器,原理就是在子应用加载前保存window对象的快照,
子应用销毁之后使用快照对比window,获取到子应用加载期间的增量并保存,等子应用再次被加载时重新挂在window上

legacySandbox

基于proxy实现的沙箱,用于单例模式,也是qiankun初代版本的沙箱,该版本由singular字段控制是否使用legacySandbox,2.2版本之后使用设置loose为true

1
sandbox: { loose: true }
  1. 该沙箱通过一个空对象fakeWindow去劫持全局window,重写空对象的set和get,
  • 1.1 获取fakeWindow某个值触发 get 就从window上取,
  • 1.2 增加window属性触发set就会记录到addedPropsMapInSandbox,
  • 1.3 修改window属性触发set,将key和window[key]记录到modifiedPropsOriginalValueMapInSandbox,第二次修改这个属性不会再做记录
  • 1.4 将变化的数据记录到currentUpdatedPropsValueMap
  • 1.5 映射到window上以便下次 get 时能拿到已更新的数据
  1. 子应用卸载时,将增量的数据从window上删除,将修改过的key对应的原数据还原到window上
  2. 子应用第二次加载时,通过currentUpdatedPropsValueMap恢复

这种沙箱会影响到全局window,因为会将proxy变化映射到window上,并没有做到真正意义上的js隔离,只适用于单例模式

proxySandbox
  1. 新的proxy沙箱在legacySandbox上进行了改进
  • 1.1 先记录window上不可配置的属性(Infinity、NaN、undefined、document、location等),创建一个空的fakeWindow,浅拷贝这些不可枚举属性的值
  • 1.2 增加或者修改window属性时触发set将值记录到fakeWindow,如果这个值之前存在,直接赋值,不存在就通过Object.defineProperty创建一个descriptor
  • 1.3 get操作则会从fakeWindow或者window取

新的proxy不会污染全局window,因为一些不可配置的属性已经被复制到fakeWindow上

css沙箱(css隔离)

experimentalStyleIsolation开启会让子应用的css添加scope

dom沙箱(shadowDom)

开启strictStyleIsolation可使用shadowDom对子应用进行隔离

应用通信

GlobalState

qiankun提供了全局state的功能,子应用可以订阅主应用的全局state,
globalState变化检测方法类似redux管理state树的实现,只会检测第一层数据的变化。

问题是目前只适用于单例模式,只能同时存在一个订阅者

magic

qiankun如何在html内容里找到项目的入口文件呢?

通过import-html-entry解析出所有的script标签 会找出带有 「entry」属性的script标签

1
2
<script src="https://r.xxx.com/xxx/vendor.xxxx.js"></script>
<script src="https://r.xxx.com/xxx/xxx.app.js" entry></script>

以上情况就会知道到xxx.app.js是我们的入口文件,那如果没有设置entry呢?

1
2
<script src="https://r.xxx.com/xxx/vendor.xxxx.js"></script>
<script src="https://r.xxx.com/xxx/xxx.app.js"></script>

如果没有设置entry,就会默认取最后一个script标签作为入口文件,这就牵扯到打包的顺序问题了
chunksSortMode

如何获取到子应用的钩子函数呢?

上面我们获取到了子应用entry,import-html-entry采用了systemjs加载动态文件的方式,
执行入口文件代码前记录window的第一个属性、第二个属性和最后一个属性,执行完再对比这三个属性,如果第一个第二个属性一样但是最后一个属性变化,表示是entry执行的结果,
则会将这个属性对应的值作为子应用入口文件export出来的钩子。

然鹅这样实现有些漏洞,由于副作用或者浏览器兼容性问题
import-html-entry的getGlobalProp实现不合理
global遍历顺序变化,导致子应用entry无法找到导出的生命周期函数
于是乎,qiankun增加了fallback方案,统一子应用注册的name和子应用打包时的libraryName,可在上面方案找不到时进行fallback

踩坑

常见问题汇总

RFC

不算完善的RFC

缺陷

  1. 官网文档不是很明确,demo也不是很清晰
  2. 官网文档跟新速度跟不上release发布

参考

  1. qiankun作者讲微前端
  2. 微前端在小米的实践

传送门

在看本篇之前,你可以看看博主的另两篇文章,有助于对本篇的理解

  1. Vue2.x数据响应篇
  2. Vue2.x-Watcher篇

v-model

传送门的两章详细讲述了Vue在处理数据响应的过程,但关于Vue在runtime时期的compile还没梳理,这章我们先从v-model开始吧。
v-model是Vue提供给用户做双向绑定的一个指令语法 原文传送门
官网对于用法讲得很清楚,可以给input、select、checkbox、radio和自定义组件使用v-model指令

上demo

1
2
3
4
5
6
7
8
9
10
11
12
13
14
15
16
17
<div id="root">
<input v-model="input.value" type="text" />
</div>
<script src="./vue.js"></script>
<script>
new Vue({
el: '#root',
data() {
return {
value: 'demo',
input: {
value: 'demo',
},
}
},
})
</script>

以上是我们常见的v-model用法,当我们再input内输入内容时 组件实例上的数据也会随之修改,这就实现了数据的双向绑定

原理

在模板编译阶段,v-model会被解析到el.directives中,我们从genDirectives方法看起

1
2
3
4
5
6
7
8
9
10
11
12
13
14
15
16
17
18
19
20
21
22
23
24
function genDirectives (el, state) {
var dirs = el.directives;
if (!dirs) { return }
var res = 'directives:[';
var hasRuntime = false;
var i, l, dir, needRuntime;
for (i = 0, l = dirs.length; i < l; i++) {
dir = dirs[i];
needRuntime = true;
var gen = state.directives[dir.name];
if (gen) {
// compile-time directive that manipulates AST.
// returns true if it also needs a runtime counterpart.
needRuntime = !!gen(el, dir, state.warn);
}
if (needRuntime) {
hasRuntime = true;
res += "{name:\"" + (dir.name) + "\",rawName:\"" + (dir.rawName) + "\"" + (dir.value ? (",value:(" + (dir.value) + "),expression:" + (JSON.stringify(dir.value))) : '') + (dir.arg ? (",arg:" + (dir.isDynamicArg ? dir.arg : ("\"" + (dir.arg) + "\""))) : '') + (dir.modifiers ? (",modifiers:" + (JSON.stringify(dir.modifiers))) : '') + "},";
}
}
if (hasRuntime) {
return res.slice(0, -1) + ']'
}
}

这个函数的目的是遍历el.directives里的指令,并用state里提供
el.directives的类型如下:

1
2
3
4
5
6
7
8
[
{
name: 'model',
rawName: 'v-model',
value: 'input.value', // v-mode后的的expression
...rest, // 其余属性 有兴趣可以打印出来看看
}
]

state.directives也提供了处理个指令的方法,对应如下:

1
2
3
4
5
6
7
8
{
on() {},
bind() {},
text() {},
html() {},
model() {},
cloak() {},
}

由此可见Vue提供了以上6中内置指令,有兴趣的同学可以到官网了解一下这几种常见指令的用法
回到正题,这里我们需要的是model处理指令的代码,如下:

1
2
3
4
5
6
7
8
9
10
11
12
13
14
15
16
17
18
19
20
21
22
23
24
25
26
27
28
29
30
31
32
33
34
35
36
37
38
39
40
41
42
43
44
45
46
47
48
49
50
51
52
function model (
el,
dir,
_warn
) {
warn$1 = _warn;
var value = dir.value;
var modifiers = dir.modifiers;
var tag = el.tag;
var type = el.attrsMap.type;

{
// inputs with type="file" are read only and setting the input's
// value will throw an error.
if (tag === 'input' && type === 'file') {
warn$1(
"<" + (el.tag) + " v-model=\"" + value + "\" type=\"file\">:\n" +
"File inputs are read only. Use a v-on:change listener instead.",
el.rawAttrsMap['v-model']
);
}
}

if (el.component) {
genComponentModel(el, value, modifiers);
// component v-model doesn't need extra runtime
return false
} else if (tag === 'select') {
genSelect(el, value, modifiers);
} else if (tag === 'input' && type === 'checkbox') {
genCheckboxModel(el, value, modifiers);
} else if (tag === 'input' && type === 'radio') {
genRadioModel(el, value, modifiers);
} else if (tag === 'input' || tag === 'textarea') {
genDefaultModel(el, value, modifiers);
} else if (!config.isReservedTag(tag)) {
genComponentModel(el, value, modifiers);
// component v-model doesn't need extra runtime
return false
} else {
warn$1(
"<" + (el.tag) + " v-model=\"" + value + "\">: " +
"v-model is not supported on this element type. " +
'If you are working with contenteditable, it\'s recommended to ' +
'wrap a library dedicated for that purpose inside a custom component.',
el.rawAttrsMap['v-model']
);
}

// ensure runtime directive metadata
return true
}

从上面的代码不难看出不同类型的组件使用v-model,解析的方式也不一样,demo我们使用的是input,根据匹配规则我们先看第五个branch,genDefaultModel代码如下:

1
2
3
4
5
6
7
8
9
10
11
12
13
14
15
16
17
18
19
20
21
22
23
24
25
26
27
28
29
30
31
32
33
34
35
36
37
38
39
40
41
42
43
44
45
46
47
48
49
50
51
52
function genDefaultModel (
el,
value,
modifiers
) {
var type = el.attrsMap.type;

// warn if v-bind:value conflicts with v-model
// except for inputs with v-bind:type
{
var value$1 = el.attrsMap['v-bind:value'] || el.attrsMap[':value'];
var typeBinding = el.attrsMap['v-bind:type'] || el.attrsMap[':type'];
if (value$1 && !typeBinding) {
var binding = el.attrsMap['v-bind:value'] ? 'v-bind:value' : ':value';
warn$1(
binding + "=\"" + value$1 + "\" conflicts with v-model on the same element " +
'because the latter already expands to a value binding internally',
el.rawAttrsMap[binding]
);
}
}

var ref = modifiers || {};
var lazy = ref.lazy;
var number = ref.number;
var trim = ref.trim;
var needCompositionGuard = !lazy && type !== 'range';
var event = lazy
? 'change'
: type === 'range'
? RANGE_TOKEN
: 'input';

var valueExpression = '$event.target.value';
if (trim) {
valueExpression = "$event.target.value.trim()";
}
if (number) {
valueExpression = "_n(" + valueExpression + ")";
}

var code = genAssignmentCode(value, valueExpression);
if (needCompositionGuard) {
code = "if($event.target.composing)return;" + code;
}

addProp(el, 'value', ("(" + value + ")"));
addHandler(el, event, code, null, true);
if (trim || number) {
addHandler(el, 'blur', '$forceUpdate()');
}
}

先判断el上是否也存在v-bind:value,为了防止和v-model冲突,会抛出错误
lazy、number、trim是v-model指令自带的修饰符,有兴趣的同学可以参考官网的用法

  1. lazy的目的是为了取代 input 监听 change 事件
  2. number的目的是为了将字符串转化为有效数字
  3. trim目的是为了去除首尾的空格
    根据上面三个修饰符对valueExpression赋予了不同的值
    1
    var code = genAssignmentCode(value, valueExpression);
    我们先看genAssignmentCode的代码
    1
    2
    3
    4
    5
    6
    7
    8
    9
    10
    11
    function genAssignmentCode (
    value,
    assignment
    ) {
    var res = parseModel(value);
    if (res.key === null) {
    return (value + "=" + assignment)
    } else {
    return ("$set(" + (res.exp) + ", " + (res.key) + ", " + assignment + ")")
    }
    }
    parseModal的代码我就不贴了,大致意思就是分析v-model的value,比如demo传入的是”input.value”,会被parseModal转化成
    1
    2
    3
    4
    {
    exp: 'input',
    key: 'value',
    }
    众所周知,v-model后面可以传入模板字符串,比如name,也可以传入对象取值的表达式,比如person.name等,
    如果我们v-model传的是”value”,返回结果是这样的
    1
    2
    3
    4
    {
    exp: 'value',
    key: null,
    }
    如果我们传入的是”person.chinese.name”,返回如下
    1
    2
    3
    4
    {
    exp: 'person.chinese',
    key: 'name',
    }
    接着看代码,根据我们的demo来看
    如果v-model后面跟的是纯字符串”value”,返回”value = $event.target.value”
    如果v-model后面跟的对象模板字符串”input.value”,返回”$set(‘input’, ‘value’, $event.target.value)”
    看到这儿,你应该能知道v-model是通过什么方式同步修改组件实例上的值了吧
    回到getDefaultModel方法:
    1
    2
    3
    4
    5
    6
    7
    8
    9
    if (needCompositionGuard) {
    code = "if($event.target.composing)return;" + code;
    }

    addProp(el, 'value', ("(" + value + ")"));
    addHandler(el, event, code, null, true);
    if (trim || number) {
    addHandler(el, 'blur', '$forceUpdate()');
    }
    needCompositionGuard作用是处理了中文输入法的问题,并将’if($event.target.composing)return;’拼接到genAssignmentCode的结果前面
    addProp:
    1
    2
    3
    4
    function addProp (el, name, value, range, dynamic) {
    (el.props || (el.props = [])).push(rangeSetItem({ name: name, value: value, dynamic: dynamic }, range));
    el.plain = false;
    }
    执行到这儿就相当于把v-model转换正v-bind:value=”input.value”了
    下一步addHandler的目的就是在el.events上增加input方法,把我们的code结果添加到input方法上,得到以下节点
    1
    <input v-bind:value="input.value" type="text" @input="if($event.target.composing)return;$set('input', 'value', $event.target.value)" />
    当然实际代码并不会直接生成这个dom节点,首先生成的应该是dom的ast结构,然后通过编译拼接成如下代码结构:
    方便阅读,就不展示字符串了
    1
    2
    3
    4
    5
    6
    7
    8
    9
    10
    11
    12
    13
    14
    15
    16
    17
    18
    with(this){
    return _c(
    'div',
    {
    attrs:{"id":"root"}
    },
    [
    _c(
    'input',
    {
    directives:[{name:"model",rawName:"v-model",value:(input.value),expression:"input.value"}],
    attrs:{"type":"text"},
    domProps:{"value":(input.value)},
    on:{"input":function($event){if($event.target.composing)return;$set(input, "value", $event.target.value)}
    }})
    ]
    )
    }
    以上的代码会通过new Function()进行封装并赋值给options.render,上一章讲到的render-watcher调用更新的时候实际调用的就是这段代码

总结

v-model的原理现在看来其实很明确了,就是在编译过程中会将v-model装换成v-bind:value(当然,这点因组件而异),并在el上添加input事件,
如果是深层的字符串模板,会生成$set对应的方法,若是单个字符串,会直接将value = $event.target.value拼接到input方法上。

前言

上一章已经简单介绍了Vue2.x的数据响应系统的三个重要角色Observer、Dep、Watcher
本篇主要想讲述用户每次操作或者数据变动到底会发生什么?换个说法Watcher是如何收到通知去进行更新操作的?

Watcher

上一章也提到了Watcher的三种类型

  1. computed-watcher
  2. normal-watcher
  3. render-watcher

computed-watcher

在组件初始化的过程中,Vue会为每个计算属性都会生成一个Watcher,并且存到当前组件实例的_watchers里,但是这类watchers不会被立即和数据的Dep进行关联,这类watcher声明时使用了lazy属性
意味着在第一次调用的时候才会去添加依赖 初始化代码如下

1
2
3
4
5
6
7
8
9
10
11
12
13
14
15
function initState (vm) {
vm._watchers = [];
var opts = vm.$options;
if (opts.props) { initProps(vm, opts.props); }
if (opts.methods) { initMethods(vm, opts.methods); }
if (opts.data) {
initData(vm);
} else {
observe(vm._data = {}, true /* asRootData */);
}
if (opts.computed) { initComputed(vm, opts.computed); }
if (opts.watch && opts.watch !== nativeWatch) {
initWatch(vm, opts.watch);
}
}

重点看initComputed

1
2
3
4
5
6
7
8
9
10
11
12
13
14
15
16
17
18
19
20
21
22
23
24
25
26
27
28
29
30
31
32
33
34
35
36
37
38
39
40
41
var computedWatcherOptions = { lazy: true };
function initComputed (vm, computed) {
// $flow-disable-line
var watchers = vm._computedWatchers = Object.create(null);
// computed properties are just getters during SSR
var isSSR = isServerRendering();

for (var key in computed) {
var userDef = computed[key];
var getter = typeof userDef === 'function' ? userDef : userDef.get;
if (process.env.NODE_ENV !== 'production' && getter == null) {
warn(
("Getter is missing for computed property \"" + key + "\"."),
vm
);
}

if (!isSSR) {
// create internal watcher for the computed property.
watchers[key] = new Watcher(
vm,
getter || noop,
noop,
computedWatcherOptions
);
}

// component-defined computed properties are already defined on the
// component prototype. We only need to define computed properties defined
// at instantiation here.
if (!(key in vm)) {
defineComputed(vm, key, userDef);
} else if (process.env.NODE_ENV !== 'production') {
if (key in vm.$data) {
warn(("The computed property \"" + key + "\" is already defined in data."), vm);
} else if (vm.$options.props && key in vm.$options.props) {
warn(("The computed property \"" + key + "\" is already defined as a prop."), vm);
}
}
}
}

以上代码会遍历computed内的键值对,为每个计算属性声明一个Watcher并将该watcher以键值对的形式存在vm.computedWatchers里,
注意lazy传的true,所以在执行构造函数的时候不会执行watcher.get,不会将该watcher收集到经过Observe劫持的数据的__ob
_.dep.subs里
再看defineComputed这个方法

1
2
3
4
5
6
7
8
9
10
11
12
13
14
15
16
17
18
19
20
21
22
23
24
25
26
27
28
29
30
31
32
33
34
35
36
var sharedPropertyDefinition = {
enumerable: true,
configurable: true,
get: noop,
set: noop
};
function defineComputed (
target,
key,
userDef
) {
var shouldCache = !isServerRendering();
if (typeof userDef === 'function') {
sharedPropertyDefinition.get = shouldCache
? createComputedGetter(key)
: createGetterInvoker(userDef);
sharedPropertyDefinition.set = noop;
} else {
sharedPropertyDefinition.get = userDef.get
? shouldCache && userDef.cache !== false
? createComputedGetter(key)
: createGetterInvoker(userDef.get)
: noop;
sharedPropertyDefinition.set = userDef.set || noop;
}
if (process.env.NODE_ENV !== 'production' &&
sharedPropertyDefinition.set === noop) {
sharedPropertyDefinition.set = function () {
warn(
("Computed property \"" + key + "\" was assigned to but it has no setter."),
this
);
};
}
Object.defineProperty(target, key, sharedPropertyDefinition);
}

defineComputed主要目的是在组件实例上定义该计算书型的getter和setter,还区分了用户有没有手写set/get,
在页面调用这个计算属性的时候会调用createComputedGetter,代码如下:

1
2
3
4
5
6
7
8
9
10
11
12
13
14
function createComputedGetter (key) {
return function computedGetter () {
var watcher = this._computedWatchers && this._computedWatchers[key];
if (watcher) {
if (watcher.dirty) {
watcher.evaluate();
}
if (Dep.target) {
watcher.depend();
}
return watcher.value
}
}
}

这里我们关注watcher.evaluate(),evaluate内部会重新执行watcher.get()进行依赖收集,
上一章提到过,并且返回最终计算结果

normal-watcher

这类watcher是指watch钩子里声明的观察函数,当然也可以通过在组件mounted手动通过this.$watch()手动去声明,后面我们会讲述这两者的区别
看initWatch代码:

1
2
3
4
5
6
7
8
9
10
11
12
function initWatch (vm, watch) {
for (var key in watch) {
var handler = watch[key];
if (Array.isArray(handler)) {
for (var i = 0; i < handler.length; i++) {
createWatcher(vm, key, handler[i]);
}
} else {
createWatcher(vm, key, handler);
}
}
}

initWatch会遍历每个watch钩子里的键值对,创建一个Watcher实例,从以上代码可以分析出watcher可以有三种声明方式
createWatcher如下:

1
2
3
4
5
6
7
8
9
10
11
12
13
14
15
function createWatcher (
vm,
expOrFn,
handler,
options
) {
if (isPlainObject(handler)) {
options = handler;
handler = handler.handler;
}
if (typeof handler === 'string') {
handler = vm[handler];
}
return vm.$watch(expOrFn, handler, options)
}

而vm.$watch执行的就是new Watcher的操作了,此类型的watcher实例在执行构造函数的时候就会去调用watcher.get(),这点和computed-watcher不一样哦~

render-watcher

上一章讲到过,这类watcher只会在每个组件$mount时声明,意味着每个组件实例都会有一个此类型的watcher,代码就不展示了,
这类watcher的作用就是提供组件内部更新的回调函数

举个例子

1
2
3
4
5
6
7
8
9
10
11
12
13
14
15
16
17
18
19
20
21
22
23
24
25
26
27
28
29
30
31
32
<div id="root">
<span>{{ name }}</span>
<span>{{ age }}</span>
<button @click="handleAddAge">add</button>
</div>
<script>
new Vue({
el: '#root',
data() {
return {
name: 'demo',
age: 12,
}
},
computed: {
res() {
return this.name + this.age
},
},
watch: {
age() {
this.name += 1
},
},
methods: {
handleAddAge() {
this.age += 1
},
},
})
</script>

上面是一个简单的demo,以此demo我们分析一下初始化过程的依赖收集和用户点击按钮会发生什么吧hah

初始化

  1. initComputed
  2. initWatch

当然这两个步骤都是发生在Vue劫持了data、props之后的
我们打印出组件实例 依赖收集的情况如下图所示:
依赖

  1. _computedWatchers存放就是每个计算属性的观察者实例
  2. _watcher存放的是当前组件初始收集依赖和更新所以要的观察者
  3. _watchers存放的是组件声明所有的watchers队列

示例图最下面,Vue会为data里的每个值声明getter和setter,在使用defineReactive定义的时候,会创建Dep实例

  1. 所以初始化的结束后,name创建的Dep实例的subs里会存放一个watcher,为render-watcher,用于更新组件
  2. 而age也声明在watch里,所以它对应的Dep实例subs会存放两个watcher,一个normal-watcher和一个render-watcher
  3. 而在res被使用后,age和name创建的Dep实例的subs都会多一个computed-watcher

数据变化

点击add按钮会让age实现自增,相应会触发watch,同时更新视图,这是给开发者看到的情况,那更往下呢,我们慢慢分析

执行了this.age += 1会触发age的setter 代码如下:

1
2
3
4
5
6
7
8
9
10
11
12
13
14
15
16
17
18
19
20
function reactiveSetter (newVal) {
var value = getter ? getter.call(obj) : val;
/* eslint-disable no-self-compare */
if (newVal === value || (newVal !== newVal && value !== value)) {
return
}
/* eslint-enable no-self-compare */
if (customSetter) {
customSetter();
}
// #7981: for accessor properties without setter
if (getter && !setter) { return }
if (setter) {
setter.call(obj, newVal);
} else {
val = newVal;
}
childOb = !shallow && observe(newVal);
dep.notify();
}
1
2
3
4
5
6
7
8
9
10
11
12
13
notify () {
// stabilize the subscriber list first
const subs = this.subs.slice()
if (process.env.NODE_ENV !== 'production' && !config.async) {
// subs aren't sorted in scheduler if not running async
// we need to sort them now to make sure they fire in correct
// order
subs.sort((a, b) => a.id - b.id)
}
for (let i = 0, l = subs.length; i < l; i++) {
subs[i].update()
}
}

触发dep.notify从而触发watcher.update
注意是先排序再触发,id是自增的,说明watcher触发的顺序是一定的,也就是声明顺序的computed-watcher > normal-watcher > render-watcher

1
2
3
4
5
6
7
8
9
10
Watcher.prototype.update = function update () {
/* istanbul ignore else */
if (this.lazy) {
this.dirty = true;
} else if (this.sync) {
this.run();
} else {
queueWatcher(this);
}
};

queueWatcher

1
2
3
4
5
6
7
8
9
10
11
12
13
14
15
16
17
18
19
20
21
22
23
24
25
26
27
export function queueWatcher (watcher: Watcher) {
const id = watcher.id
if (has[id] == null) {
has[id] = true
if (!flushing) {
queue.push(watcher)
} else {
// if already flushing, splice the watcher based on its id
// if already past its id, it will be run next immediately.
let i = queue.length - 1
while (i > index && queue[i].id > watcher.id) {
i--
}
queue.splice(i + 1, 0, watcher)
}
// queue the flush
if (!waiting) {
waiting = true

if (process.env.NODE_ENV !== 'production' && !config.async) {
flushSchedulerQueue()
return
}
nextTick(flushSchedulerQueue)
}
}
}

代码里有个has集合,用于存放本次更新触发的watcher,避免了同一个watcher被触发两次,也算是节省了性能
nextTick大家应该都不陌生,这个api作用实际上就是把更新任务方法放到微任务去做,这样做的好处我们用代码说明吧
demo里触发了按钮的回调,修改了this.age正常来说,this.age修改后就应该调用render-watcher的更新回调来更新视图,然后触发watch钩子里的age监听修改name,重复操作再次更新视图
这样就导致了可能一次操作要重新调好几次update,而且更新视图是比较消耗性能的,其间包括了重新生成vnode,与oldVnode进行diff比较,updateChildren等一系列操作。

如何让一个一次改动所带来watcher的执行共用一次更新操作呢?

nextTick起到了重大的作用,拿demo来讲,在age变化触发normal-watcher,queueWatcher方法后把这个任务方法放到微任务里,这样这个微任务不会立马执行,
主线程会继续执行,会触发age对应的render-watcher,但是此时waiting为true,render-watcher不会触发flushSchedulerQueue,但是此时render-watcher已经存在于执行队列里了
所以
看flushSchedulerQueue的代码

1
2
3
4
5
6
7
8
9
10
11
12
13
14
15
16
17
18
19
20
21
22
23
24
25
26
27
28
29
30
31
32
33
34
35
36
37
38
39
40
41
42
43
44
45
46
47
48
49
50
51
52
53
54
55
56
57
58
function flushSchedulerQueue () {
currentFlushTimestamp = getNow();
flushing = true;
var watcher, id;

// Sort queue before flush.
// This ensures that:
// 1. Components are updated from parent to child. (because parent is always
// created before the child)
// 2. A component's user watchers are run before its render watcher (because
// user watchers are created before the render watcher)
// 3. If a component is destroyed during a parent component's watcher run,
// its watchers can be skipped.
queue.sort(function (a, b) { return a.id - b.id; });

// do not cache length because more watchers might be pushed
// as we run existing watchers
for (index = 0; index < queue.length; index++) {
watcher = queue[index];
if (watcher.before) {
watcher.before();
}
id = watcher.id;
has[id] = null;
watcher.run();
// in dev build, check and stop circular updates.
if (has[id] != null) {
circular[id] = (circular[id] || 0) + 1;
if (circular[id] > MAX_UPDATE_COUNT) {
warn(
'You may have an infinite update loop ' + (
watcher.user
? ("in watcher with expression \"" + (watcher.expression) + "\"")
: "in a component render function."
),
watcher.vm
);
break
}
}
}

// keep copies of post queues before resetting state
var activatedQueue = activatedChildren.slice();
var updatedQueue = queue.slice();

resetSchedulerState();

// call component updated and activated hooks
callActivatedHooks(activatedQueue);
callUpdatedHooks(updatedQueue);

// devtool hook
/* istanbul ignore if */
if (devtools && config.devtools) {
devtools.emit('flush');
}
}

这一步就是直接遍历queue,触发watcher.run去执行watcher的回调函数
我们先看看watcher.run的代码

1
2
3
4
5
6
7
8
9
10
11
12
13
14
15
16
17
18
19
20
21
22
23
24
25
26
run () {
if (this.active) {
const value = this.get()
if (
value !== this.value ||
// Deep watchers and watchers on Object/Arrays should fire even
// when the value is the same, because the value may
// have mutated.
isObject(value) ||
this.deep
) {
// set new value
const oldValue = this.value
this.value = value
if (this.user) {
try {
this.cb.call(this.vm, value, oldValue)
} catch (e) {
handleError(e, this.vm, `callback for watcher "${this.expression}"`)
}
} else {
this.cb.call(this.vm, value, oldValue)
}
}
}
}

这部分代码目的就是执行watcher的回调
对于render-watcher来说,this.get()执行的是组件的更新方法
对于normal-watcher来说,this.get()执行的是watcher的handler

按上述demo的执行顺序

  1. 执行age对应的normal-watcher,执行了this.name += 1,此时又会触发name的setter,而name对应的Dep实例里只有render-watcher
  2. 但是此时age变化导致的render-watcher还没有触发,has集合里毅依然存在组件更新的回调,所以age对应的render-watcher不会被加到queue队列里
  3. 最后才会执行render-watcher一顿更新操作
  4. queue里的watcher都执行完毕会重置has、waiting等属性,表示次轮更新结束

讲到这儿,可能还是有点懵逼吧,看图
queueWatcher

前言

vue-next的推出吸引了大批用户的目光,网上也随之出现了很多介绍原理的篇幅,那是不是就意味着Vue2.x在3的版本出现后就会淡出人们的视野呢?
答案是否定的 Vue2.x还是有很多值得我们去学习的地方,本篇主讲Vue2.x版本是如何做数据响应视图的

正文

提到Vue的响应原理就不得不说到三个重要人物 分别是Observer、Dep和Watcher
这三者各司其职,完成了Vue对于数据和视图的链接,通过观察者模式打通了数据驱动视图的桥梁

  1. Observer负责对Vue实例data、props、computed里的数据进行数据劫持
  2. Watcher负责提供数据更新的回调
  3. Dep则是Observer和Watcher的桥梁 会存放某个数据变化的订阅者 在被Observer劫持的数据变化时会去通知所有订阅的Watcher进行更新

下面我们分别介绍这几个点以及他们所扮演的重要角色吧
以下的代码都是编译过的!!! 没有flow看的舒服一点~

Observer

先看Observer的源码

1
2
3
4
5
6
7
8
9
10
11
12
13
14
15
16
17
18
19
20
21
22
23
24
25
26
27
28
29
30
31
32
33
34
35
36
37
38
39
40
41
42
43
44
45
46
47
48
49
50
51
52
53
54
55
56
57
58
59
60
61
62
63
64
65
66
67
68
69
70
71
72
73
74
75
76
77
78
79
80
81
82
83
84
85
86
87
88
89
90
var Observer = function Observer (value) {
this.value = value;
this.dep = new Dep();
this.vmCount = 0;
def(value, '__ob__', this);
if (Array.isArray(value)) {
if (hasProto) {
protoAugment(value, arrayMethods);
} else {
copyAugment(value, arrayMethods, arrayKeys);
}
this.observeArray(value);
} else {
this.walk(value);
}
};

Observer.prototype.walk = function walk (obj) {
var keys = Object.keys(obj);
for (var i = 0; i < keys.length; i++) {
defineReactive$$1(obj, keys[i]);
}
};

Observer.prototype.observeArray = function observeArray (items) {
for (var i = 0, l = items.length; i < l; i++) {
observe(items[i]);
}
};

function defineReactive$$1 (
obj,
key,
val,
customSetter,
shallow
) {
var dep = new Dep();

var property = Object.getOwnPropertyDescriptor(obj, key);
if (property && property.configurable === false) {
return
}

// cater for pre-defined getter/setters
var getter = property && property.get;
var setter = property && property.set;
if ((!getter || setter) && arguments.length === 2) {
val = obj[key];
}

var childOb = !shallow && observe(val);
Object.defineProperty(obj, key, {
enumerable: true,
configurable: true,
get: function reactiveGetter () {
var value = getter ? getter.call(obj) : val;
if (Dep.target) {
dep.depend();
if (childOb) {
childOb.dep.depend();
if (Array.isArray(value)) {
dependArray(value);
}
}
}
return value
},
set: function reactiveSetter (newVal) {
var value = getter ? getter.call(obj) : val;
/* eslint-disable no-self-compare */
if (newVal === value || (newVal !== newVal && value !== value)) {
return
}
/* eslint-enable no-self-compare */
if (customSetter) {
customSetter();
}
// #7981: for accessor properties without setter
if (getter && !setter) { return }
if (setter) {
setter.call(obj, newVal);
} else {
val = newVal;
}
childOb = !shallow && observe(newVal);
dep.notify();
}
});
}

Observe.js的代码很简单
首先是个构造函数,主要作用是对一个对象或者数组递归的通过Object.defineProperty进行处理
有一点值得注意的是,由于Object.defineProperty无法通过setter检测到push等方法导致数组的变化
Vue巧妙的在Array.prototype前面加了个拦截器 下面是拦截器的内容

1
2
3
4
5
6
7
8
9
10
11
12
13
14
15
16
17
18
19
20
21
22
23
24
25
26
27
28
29
30
31
32
33
34
35
36
37
38
39
40
41
42
43
44
45
46
47
48
49
50
var arrayProto = Array.prototype;
var arrayMethods = Object.create(arrayProto);

var methodsToPatch = [
'push',
'pop',
'shift',
'unshift',
'splice',
'sort',
'reverse'
];

/**
* Intercept mutating methods and emit events
*/
methodsToPatch.forEach(function (method) {
// cache original method
var original = arrayProto[method];
def(arrayMethods, method, function mutator () {
var args = [], len = arguments.length;
while ( len-- ) args[ len ] = arguments[ len ];

var result = original.apply(this, args);
var ob = this.__ob__;
var inserted;
switch (method) {
case 'push':
case 'unshift':
inserted = args;
break
case 'splice':
inserted = args.slice(2);
break
}
if (inserted) { ob.observeArray(inserted); }
// notify change
ob.dep.notify();
return result
});
});

function def (obj, key, val, enumerable) {
Object.defineProperty(obj, key, {
value: val,
enumerable: !!enumerable,
writable: true,
configurable: true
});
}

从上面的代码不难看出 Vue在Array.prototype上用Object.defineProperty加了一层拦截 被劫持的数组只要调用methodsToPatch里的方法就会触发defineProperty的value方法
在保持数组原操作的同时也能获取到变化的内容并调用ob.dep.notify进行更新通知

依赖中心(Dep)

上面讲了Vue里面针对data、props、computed的数据劫持 那我们怎么知道什么这些数据变化要通知谁呢,这就要引出我们的中间角色Dep
看看Dep的代码

1
2
3
4
5
6
7
8
9
10
11
12
13
14
15
16
17
18
19
20
21
22
23
24
25
26
27
28
29
30
31
32
33
34
35
36
37
38
39
40
41
42
43
44
45
46
47
48
49
50
51
52
53
54
var uid = 0;

/**
* A dep is an observable that can have multiple
* directives subscribing to it.
*/
var Dep = function Dep () {
this.id = uid++;
this.subs = [];
};

Dep.prototype.addSub = function addSub (sub) {
this.subs.push(sub);
};

Dep.prototype.removeSub = function removeSub (sub) {
remove(this.subs, sub);
};

Dep.prototype.depend = function depend () {
if (Dep.target) {
Dep.target.addDep(this);
}
};

Dep.prototype.notify = function notify () {
// stabilize the subscriber list first
var subs = this.subs.slice();
if (!config.async) {
// subs aren't sorted in scheduler if not running async
// we need to sort them now to make sure they fire in correct
// order
subs.sort(function (a, b) { return a.id - b.id; });
}
for (var i = 0, l = subs.length; i < l; i++) {
subs[i].update();
}
};

// The current target watcher being evaluated.
// This is globally unique because only one watcher
// can be evaluated at a time.
Dep.target = null;
var targetStack = [];

function pushTarget (target) {
targetStack.push(target);
Dep.target = target;
}

function popTarget () {
targetStack.pop();
Dep.target = targetStack[targetStack.length - 1];
}

Dep的代码也相当精简,内部就存储了id和subs(订阅者队列,相关的watcher)
它的原型上有几个方法

  1. addSub: 添加watcher
  2. removeSub: 移除watcher
  3. depend: 后面讲
  4. notify: 遍历subs数组 通知每个watcher进行update

Dep的重点是最后的Dep.target 这个在defineReactive时也有用到 如下

1
2
3
4
5
6
7
8
9
10
11
12
13
14
15
Object.defineProperty(obj, key, {
get: function reactiveGetter () {
const value = getter ? getter.call(obj) : val
if (Dep.target) {
dep.depend()
if (childOb) {
childOb.dep.depend()
if (Array.isArray(value)) {
dependArray(value)
}
}
}
return value
},
})

Dep.target的作用是在这里还看不出来 我们往下watcher就会明白了

Watcher

现在有了(观察者)数据劫持和依赖收集,那自然少不了订阅者啦,Watcher核心代码如下
精简版代码如下:

1
2
3
4
5
6
7
8
9
10
11
12
13
14
15
16
17
18
19
20
21
22
23
24
25
26
27
28
29
30
31
32
33
34
35
36
37
38
39
40
41
42
43
44
45
46
47
48
49
50
51
52
var Watcher = function Watcher (
vm,
expOrFn,
cb,
options,
isRenderWatcher
) {
this.vm = vm;
if (isRenderWatcher) {
vm._watcher = this;
}
vm._watchers.push(this);
// options
if (options) {
this.deep = !!options.deep;
this.user = !!options.user;
this.lazy = !!options.lazy;
this.sync = !!options.sync;
this.before = options.before;
} else {
this.deep = this.user = this.lazy = this.sync = false;
}
this.cb = cb;
this.id = ++uid$2; // uid for batching
this.active = true;
this.dirty = this.lazy; // for lazy watchers
this.deps = [];
this.newDeps = [];
this.depIds = new _Set();
this.newDepIds = new _Set();
this.expression = expOrFn.toString();
// parse expression for getter
// render-watcher
if (typeof expOrFn === 'function') {
this.getter = expOrFn;
} else {
// 在组件内使用watch监听
this.getter = parsePath(expOrFn);
if (!this.getter) {
this.getter = noop;
warn(
"Failed watching path: \"" + expOrFn + "\" " +
'Watcher only accepts simple dot-delimited paths. ' +
'For full control, use a function instead.',
vm
);
}
}
this.value = this.lazy
? undefined
: this.get();
};

以上是Watcher的构造函数 重点关注expOrFn和isRenderWatcher这两个参数
先介绍一下Watcher是个啥吧
有三种Watcher

  1. computed-watcher: 定义在钩子computed,每个计算属性都会通过initComputed生成一个watcher
  2. normal-watcher: 在钩子watch里定义的,每个watch都会通过initWatch调用vm.$watch生成一个watcher
  3. render-watcher: 组件在调用$mount时会实例化一个组件级别的watcher 用于组件内部的更新

当然执行顺序也是 computed-watcher -> normal-watcher -> render-watcher 这样能保证每次更新时computed的属性是及时的
看到构造函数最后执行了this.get() 这个方法就是依赖收集的关键 我们会从上面三种watcher的角度分别阐述
先看get代码:

1
2
3
4
5
6
7
8
9
10
11
12
13
14
15
16
17
18
19
20
21
22
23
Watcher.prototype.get = function get () {
pushTarget(this);
var value;
var vm = this.vm;
try {
value = this.getter.call(vm, vm);
} catch (e) {
if (this.user) {
handleError(e, vm, ("getter for watcher \"" + (this.expression) + "\""));
} else {
throw e
}
} finally {
// "touch" every property so they are all tracked as
// dependencies for deep watching
if (this.deep) {
traverse(value);
}
popTarget();
this.cleanupDeps();
}
return value
};

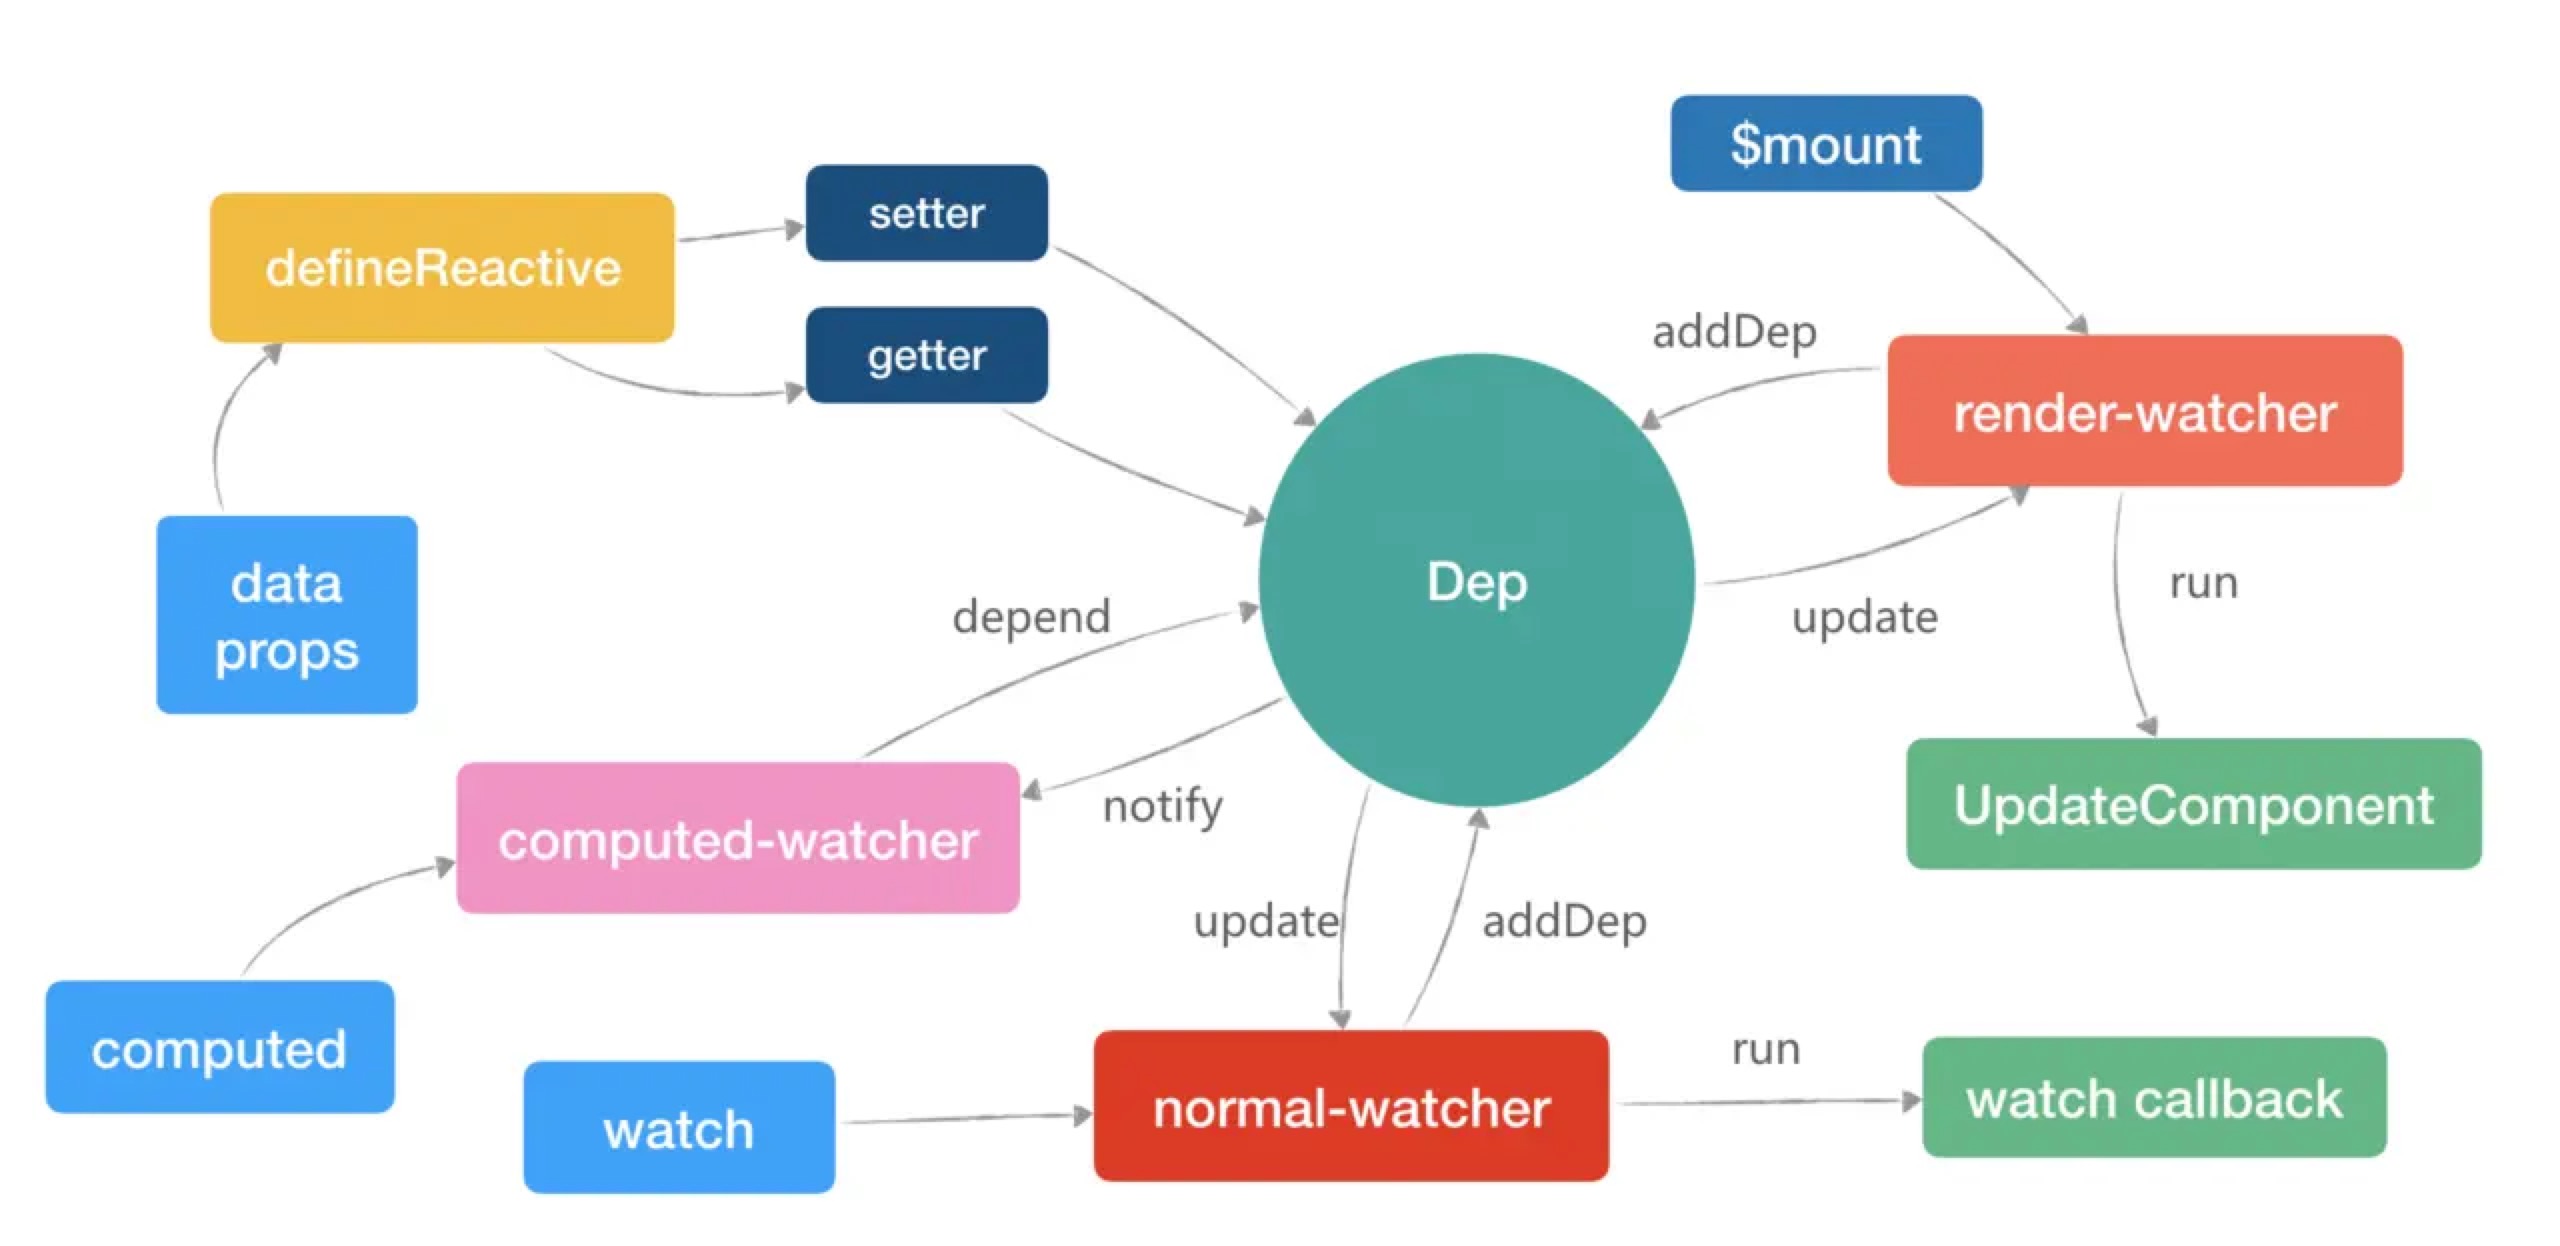
看到pushTarget和popTarget是不是很眼熟,这不就是Dep里提供的两个方法嘛
这两个方法的作用就是形成一个闭包 value = this.getter.call(vm, vm)
这一步会触发被劫持数据的get钩子 此时Dep.target就是当前的watcher实例
所有触发getter的对象都会触发dep.depend() 如下:

1
2
3
4
5
depend () {
if (Dep.target) {
Dep.target.addDep(this)
}
}

进而触发当前watcher的addDep方法:

1
2
3
4
5
6
7
8
9
10
addDep (dep) {
const id = dep.id
if (!this.newDepIds.has(id)) {
this.newDepIds.add(id)
this.newDeps.push(dep)
if (!this.depIds.has(id)) {
dep.addSub(this)
}
}
}

最后在调用dep.addSub将数据依赖到的watcher收集到dep.subs里了,等该数据的setter被触发后再调用dep.notify()通知所有订阅者要更新视图啦

实际上在一个vue组件初始化的过程中会有以下几个操作 这里只讲本篇用到的hah

初始化computed 通过initComputed给每个计算属性生成对应的Watcher
  1. 此时expOrFn作为参数传进来是个function 并且isRenderWatcher为false 在构造函数会直接赋值给this.getter 在需要用到的时候会调用get方法获取到value
  2. 但是这类Watcher有个特点:当计算属性依赖于其他数据时,属性并不会立即重新计算,只有之后其他地方需要读取属性的时候,它才会真正计算,即具备lazy(懒计算)特性
  3. 实际上,在组件初始化的过程中,会把computed的watcher存在vm._computedWatchers里,真正用到的时候才会将依赖存进dep 详情代码请看defineComputed
如果钩子函数watch存在监听 会调用initWatch -> createWactehr -> vm.$watch对每个监听创建对应的watcher
  1. 此时expOrFn是string类型 会执行this.getter = parsePath(expOrFn) parsePath代码如下 这个方法的目的就是通过watch的名字循环的触发数据的getter达到依赖收集的作用
  2. 其他逻辑和computed一致
1
2
3
4
5
6
7
8
9
10
11
12
13
export function parsePath (path: string): any {
if (bailRE.test(path)) {
return
}
const segments = path.split('.')
return function (obj) {
for (let i = 0; i < segments.length; i++) {
if (!obj) return
obj = obj[segments[i]]
}
return obj
}
}
组件在真正渲染之前会调用$mount 该步骤的目的是生成vnode 并且给每个组件生成一个render-watcher作为内部更新的方法 代码如下:
  1. 此时expOrFn是一个函数updateComponent 如下
  2. updateComponent负责组件的编译 编译过程中替换模板内的变量是也会触发变量的getter,从而达到收集依赖的作用,这里牵扯到compile部分,不多讲 抽时间单独介绍
  3. 其他逻辑与上面一致
1
2
3
4
5
6
7
8
9
10
11
12
13
14
15
16
17
18
19
20
21
22
23
24
25
26
27
28
29
30
31
32
33
34
35
36
37
38
39
40
41
42
43
44
45
46
47
48
49
50
51
52
53
54
55
56
57
58
59
60
61
62
63
64
65
66
67
68
69
70
71
72
73
function mountComponent (
vm,
el,
hydrating
) {
vm.$el = el;
if (!vm.$options.render) {
vm.$options.render = createEmptyVNode;
{
/* istanbul ignore if */
if ((vm.$options.template && vm.$options.template.charAt(0) !== '#') ||
vm.$options.el || el) {
warn(
'You are using the runtime-only build of Vue where the template ' +
'compiler is not available. Either pre-compile the templates into ' +
'render functions, or use the compiler-included build.',
vm
);
} else {
warn(
'Failed to mount component: template or render function not defined.',
vm
);
}
}
}
callHook(vm, 'beforeMount');

var updateComponent;
/* istanbul ignore if */
if (config.performance && mark) {
updateComponent = function () {
var name = vm._name;
var id = vm._uid;
var startTag = "vue-perf-start:" + id;
var endTag = "vue-perf-end:" + id;

mark(startTag);
var vnode = vm._render();
mark(endTag);
measure(("vue " + name + " render"), startTag, endTag);

mark(startTag);
vm._update(vnode, hydrating);
mark(endTag);
measure(("vue " + name + " patch"), startTag, endTag);
};
} else {
updateComponent = function () {
vm._update(vm._render(), hydrating);
};
}

// we set this to vm._watcher inside the watcher's constructor
// since the watcher's initial patch may call $forceUpdate (e.g. inside child
// component's mounted hook), which relies on vm._watcher being already defined
new Watcher(vm, updateComponent, noop, {
before: function before () {
if (vm._isMounted && !vm._isDestroyed) {
callHook(vm, 'beforeUpdate');
}
}
}, true /* isRenderWatcher */);
hydrating = false;

// manually mounted instance, call mounted on self
// mounted is called for render-created child components in its inserted hook
if (vm.$vnode == null) {
vm._isMounted = true;
callHook(vm, 'mounted');
}
return vm
}

最后上一张图 帮助理解

reactive

参考链接

Vue 数据响应式原理

其他链接

看了数据响应这块的你 也可以看看Vue2.x关于patch的解读哦

  1. vue-patch

服务器端渲染-SSR

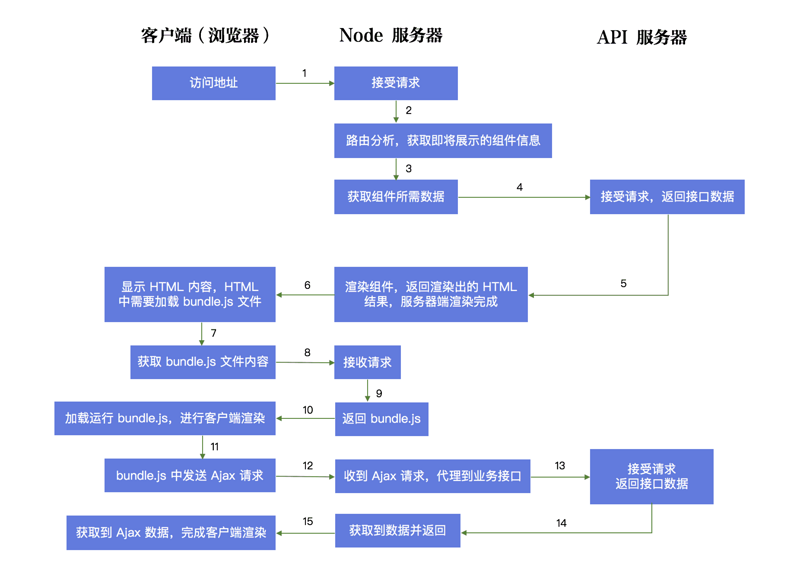
服务端渲染(SSR: Server Side Rendering),用户请求服务器,服务器上直接生成 HTML 内容并返回给浏览器。服务器端渲染来,页面的内容是由 Server 端生成的。一般来说,服务器端渲染的页面交互能力有限,如果要实现复杂交互,还是要通过引入 JavaScript 文件来辅助实现。服务器端渲染这个概念,适用于任何后端语言。。

为什么要使用SSR技术

CSR 项目的 SEO 能力极弱,在搜索引擎中基本上不可能有好的排名。因为目前大多数搜索引擎主要识别的内容还是 HTML,对 JavaScript 文件内容的识别都还比较弱。如果一个项目的流量入口来自于搜索引擎,这个时候你使用 CSR 进行开发,就非常不合适了

SSR 的产生,主要就是为了解决上面所说的问题。在 React 中使用 SSR 技术,我们让 React 代码在服务器端先执行一次,使得用户下载的 HTML 已经包含了所有的页面展示内容,这样,页面展示的过程只需要经历一个 HTTP 请求周期,TTFP 时间得到一倍以上的缩减。

同时,由于 HTML 中已经包含了网页的所有内容,所以网页的 SEO 效果也会变的非常好。之后,我们让 React 代码在客户端再次执行,为 HTML 网页中的内容添加数据及事件的绑定,页面就具备了 React 的各种交互能力。

来张图先

next

安装next.js

  1. yarn add next react react-dom
  2. 在package.json-scripts添加
    1
    2
    3
    4
    5
    {
    "dev": "next",
    "build": "next build",
    "start": "next start"
    }

目录结构

  • pages
  • public
  • node_modules
  • .next
  • next.config.js
  • server.js
  • package.json

路由

  1. Next.js没有路由配置文件 是通过node文件系统的读取到的路径作为页面的路由 在pages下新增index.js 启动项目就能在localhost:3000下面看到index页
  2. 使用next提供了Link组件和Router进行路由跳转
  3. withRouter

Dynamic Routing

  1. 使用query
  2. 不能真正支持params模式

meta配置

nuxt.js将页面的head集中到了nuxt.config.js配置文件 next提供了Head组件用于配置页面的meta

CSS

  1. Built-in CSS support: