Vue2.x之数据响应篇

前言

vue-next的推出吸引了大批用户的目光,网上也随之出现了很多介绍原理的篇幅,那是不是就意味着Vue2.x在3的版本出现后就会淡出人们的视野呢?
答案是否定的 Vue2.x还是有很多值得我们去学习的地方,本篇主讲Vue2.x版本是如何做数据响应视图的

正文

提到Vue的响应原理就不得不说到三个重要人物 分别是Observer、Dep和Watcher
这三者各司其职,完成了Vue对于数据和视图的链接,通过观察者模式打通了数据驱动视图的桥梁

  1. Observer负责对Vue实例data、props、computed里的数据进行数据劫持
  2. Watcher负责提供数据更新的回调
  3. Dep则是Observer和Watcher的桥梁 会存放某个数据变化的订阅者 在被Observer劫持的数据变化时会去通知所有订阅的Watcher进行更新

下面我们分别介绍这几个点以及他们所扮演的重要角色吧
以下的代码都是编译过的!!! 没有flow看的舒服一点~

Observer

先看Observer的源码

1
2
3
4
5
6
7
8
9
10
11
12
13
14
15
16
17
18
19
20
21
22
23
24
25
26
27
28
29
30
31
32
33
34
35
36
37
38
39
40
41
42
43
44
45
46
47
48
49
50
51
52
53
54
55
56
57
58
59
60
61
62
63
64
65
66
67
68
69
70
71
72
73
74
75
76
77
78
79
80
81
82
83
84
85
86
87
88
89
90
var Observer = function Observer (value) {
this.value = value;
this.dep = new Dep();
this.vmCount = 0;
def(value, '__ob__', this);
if (Array.isArray(value)) {
if (hasProto) {
protoAugment(value, arrayMethods);
} else {
copyAugment(value, arrayMethods, arrayKeys);
}
this.observeArray(value);
} else {
this.walk(value);
}
};

Observer.prototype.walk = function walk (obj) {
var keys = Object.keys(obj);
for (var i = 0; i < keys.length; i++) {
defineReactive$$1(obj, keys[i]);
}
};

Observer.prototype.observeArray = function observeArray (items) {
for (var i = 0, l = items.length; i < l; i++) {
observe(items[i]);
}
};

function defineReactive$$1 (
obj,
key,
val,
customSetter,
shallow
) {
var dep = new Dep();

var property = Object.getOwnPropertyDescriptor(obj, key);
if (property && property.configurable === false) {
return
}

// cater for pre-defined getter/setters
var getter = property && property.get;
var setter = property && property.set;
if ((!getter || setter) && arguments.length === 2) {
val = obj[key];
}

var childOb = !shallow && observe(val);
Object.defineProperty(obj, key, {
enumerable: true,
configurable: true,
get: function reactiveGetter () {
var value = getter ? getter.call(obj) : val;
if (Dep.target) {
dep.depend();
if (childOb) {
childOb.dep.depend();
if (Array.isArray(value)) {
dependArray(value);
}
}
}
return value
},
set: function reactiveSetter (newVal) {
var value = getter ? getter.call(obj) : val;
/* eslint-disable no-self-compare */
if (newVal === value || (newVal !== newVal && value !== value)) {
return
}
/* eslint-enable no-self-compare */
if (customSetter) {
customSetter();
}
// #7981: for accessor properties without setter
if (getter && !setter) { return }
if (setter) {
setter.call(obj, newVal);
} else {
val = newVal;
}
childOb = !shallow && observe(newVal);
dep.notify();
}
});
}

Observe.js的代码很简单
首先是个构造函数,主要作用是对一个对象或者数组递归的通过Object.defineProperty进行处理
有一点值得注意的是,由于Object.defineProperty无法通过setter检测到push等方法导致数组的变化
Vue巧妙的在Array.prototype前面加了个拦截器 下面是拦截器的内容

1
2
3
4
5
6
7
8
9
10
11
12
13
14
15
16
17
18
19
20
21
22
23
24
25
26
27
28
29
30
31
32
33
34
35
36
37
38
39
40
41
42
43
44
45
46
47
48
49
50
var arrayProto = Array.prototype;
var arrayMethods = Object.create(arrayProto);

var methodsToPatch = [
'push',
'pop',
'shift',
'unshift',
'splice',
'sort',
'reverse'
];

/**
* Intercept mutating methods and emit events
*/
methodsToPatch.forEach(function (method) {
// cache original method
var original = arrayProto[method];
def(arrayMethods, method, function mutator () {
var args = [], len = arguments.length;
while ( len-- ) args[ len ] = arguments[ len ];

var result = original.apply(this, args);
var ob = this.__ob__;
var inserted;
switch (method) {
case 'push':
case 'unshift':
inserted = args;
break
case 'splice':
inserted = args.slice(2);
break
}
if (inserted) { ob.observeArray(inserted); }
// notify change
ob.dep.notify();
return result
});
});

function def (obj, key, val, enumerable) {
Object.defineProperty(obj, key, {
value: val,
enumerable: !!enumerable,
writable: true,
configurable: true
});
}
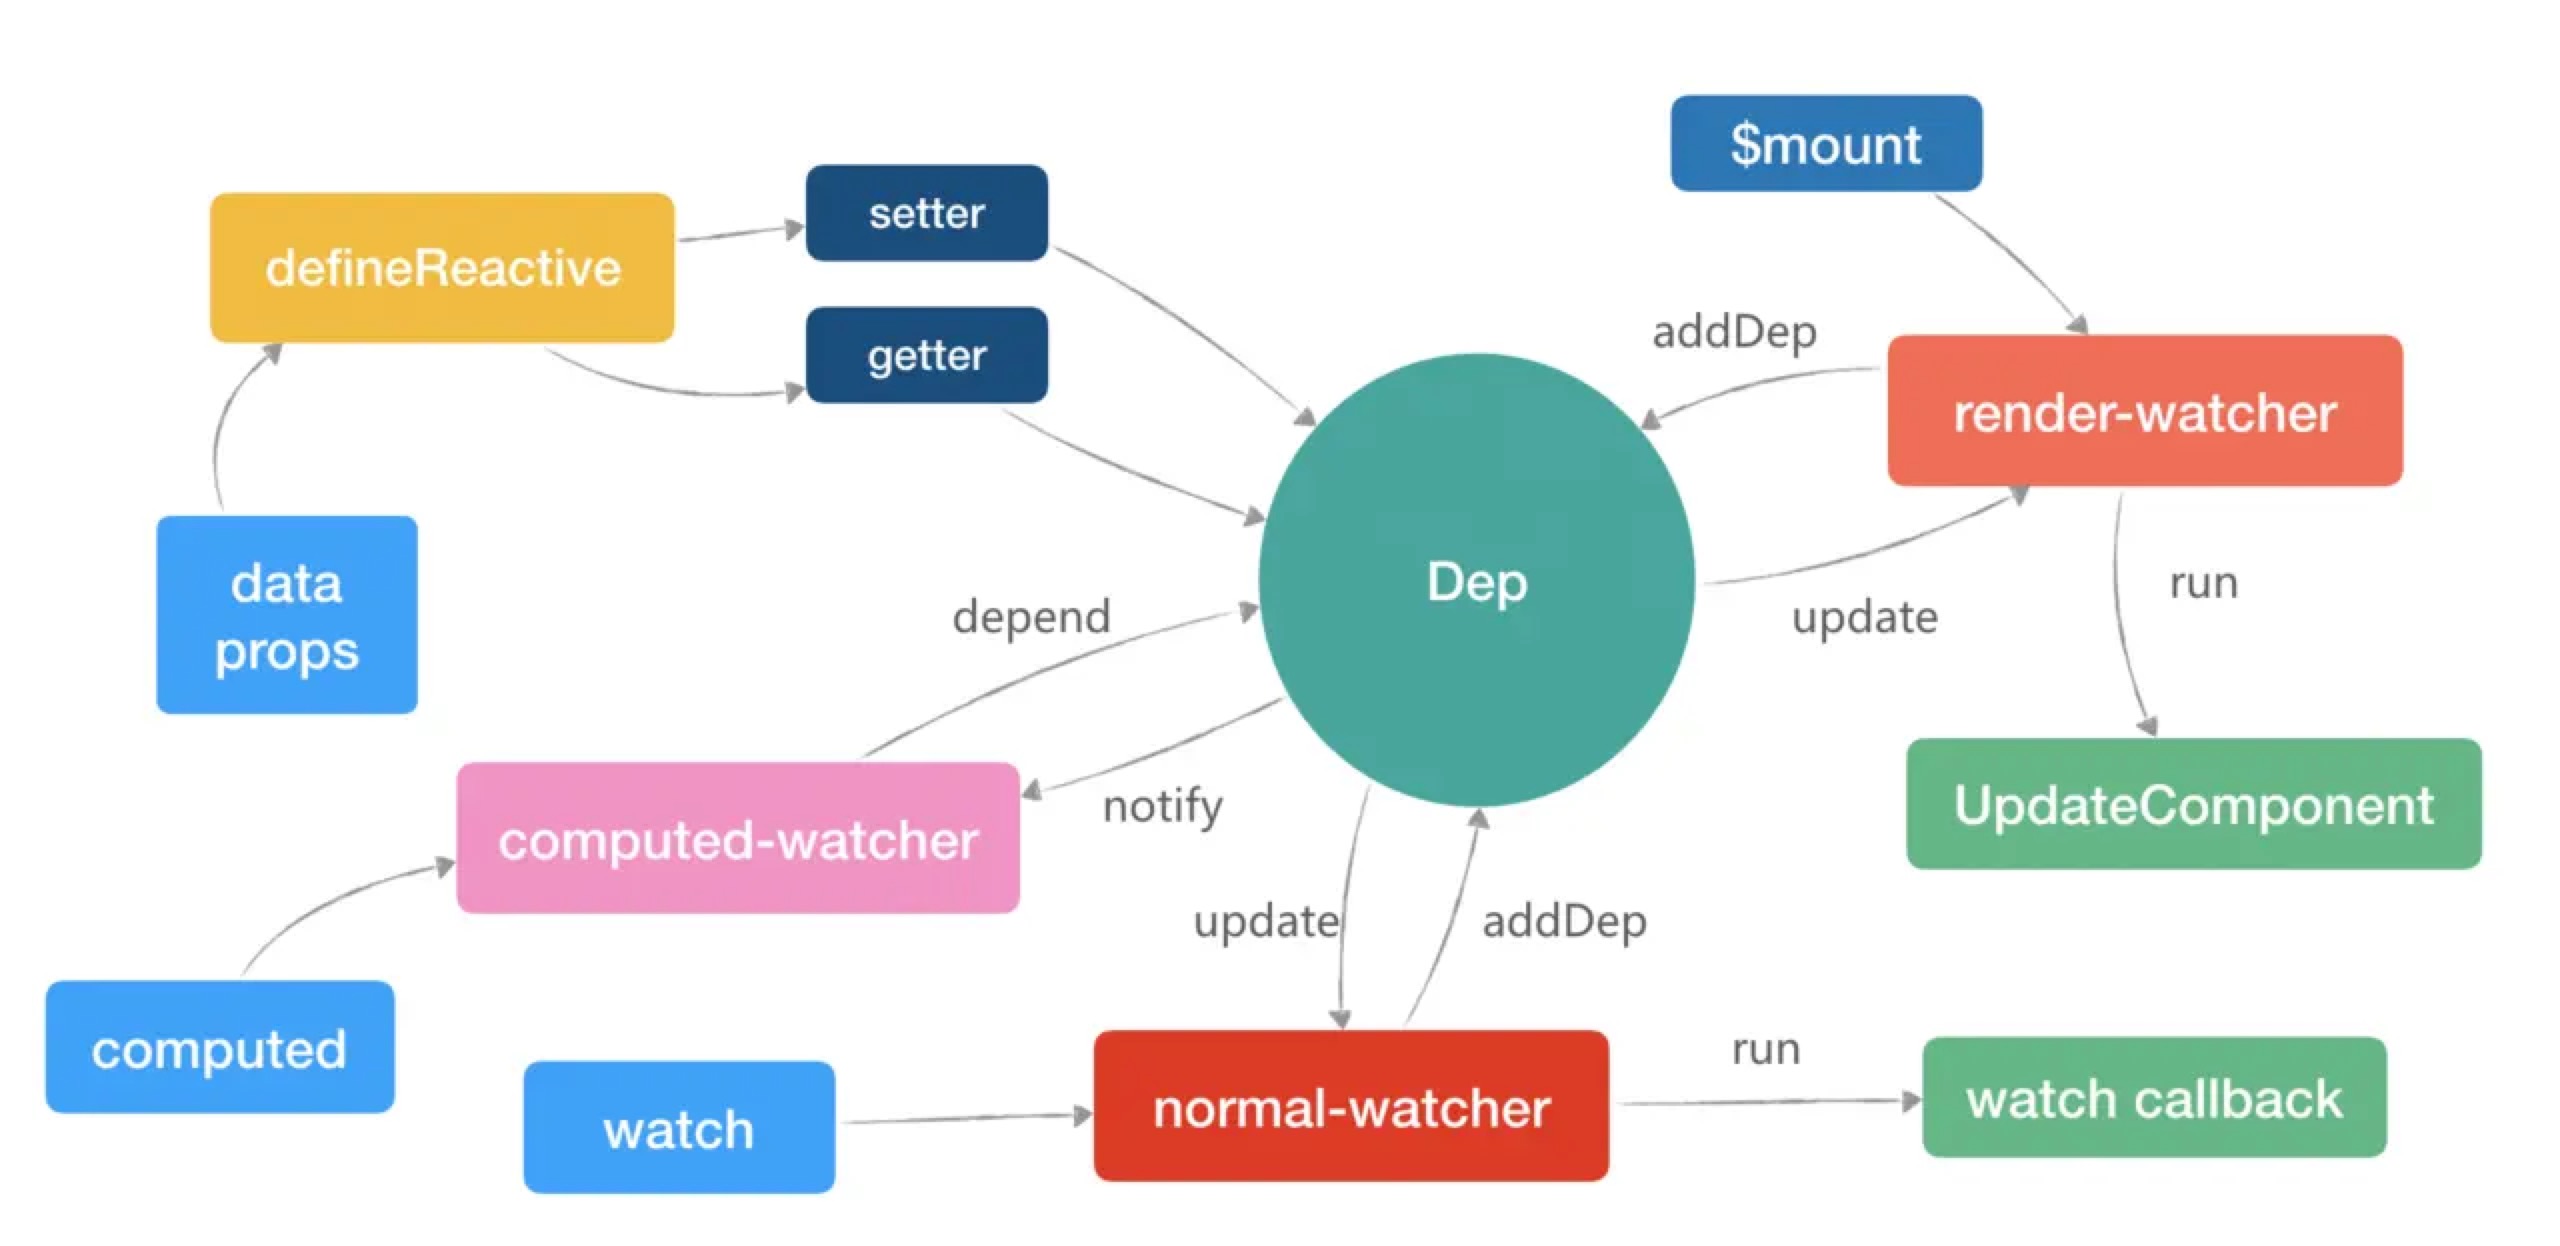
从上面的代码不难看出 Vue在Array.prototype上用Object.defineProperty加了一层拦截 被劫持的数组只要调用methodsToPatch里的方法就会触发defineProperty的value方法
在保持数组原操作的同时也能获取到变化的内容并调用ob.dep.notify进行更新通知

依赖中心(Dep)

上面讲了Vue里面针对data、props、computed的数据劫持 那我们怎么知道什么这些数据变化要通知谁呢,这就要引出我们的中间角色Dep
看看Dep的代码

1
2
3
4
5
6
7
8
9
10
11
12
13
14
15
16
17
18
19
20
21
22
23
24
25
26
27
28
29
30
31
32
33
34
35
36
37
38
39
40
41
42
43
44
45
46
47
48
49
50
51
52
53
54
var uid = 0;

/**
* A dep is an observable that can have multiple
* directives subscribing to it.
*/
var Dep = function Dep () {
this.id = uid++;
this.subs = [];
};

Dep.prototype.addSub = function addSub (sub) {
this.subs.push(sub);
};

Dep.prototype.removeSub = function removeSub (sub) {
remove(this.subs, sub);
};

Dep.prototype.depend = function depend () {
if (Dep.target) {
Dep.target.addDep(this);
}
};

Dep.prototype.notify = function notify () {
// stabilize the subscriber list first
var subs = this.subs.slice();
if (!config.async) {
// subs aren't sorted in scheduler if not running async
// we need to sort them now to make sure they fire in correct
// order
subs.sort(function (a, b) { return a.id - b.id; });
}
for (var i = 0, l = subs.length; i < l; i++) {
subs[i].update();
}
};

// The current target watcher being evaluated.
// This is globally unique because only one watcher
// can be evaluated at a time.
Dep.target = null;
var targetStack = [];

function pushTarget (target) {
targetStack.push(target);
Dep.target = target;
}

function popTarget () {
targetStack.pop();
Dep.target = targetStack[targetStack.length - 1];
}

Dep的代码也相当精简,内部就存储了id和subs(订阅者队列,相关的watcher)
它的原型上有几个方法

  1. addSub: 添加watcher
  2. removeSub: 移除watcher
  3. depend: 后面讲
  4. notify: 遍历subs数组 通知每个watcher进行update

Dep的重点是最后的Dep.target 这个在defineReactive时也有用到 如下

1
2
3
4
5
6
7
8
9
10
11
12
13
14
15
Object.defineProperty(obj, key, {
get: function reactiveGetter () {
const value = getter ? getter.call(obj) : val
if (Dep.target) {
dep.depend()
if (childOb) {
childOb.dep.depend()
if (Array.isArray(value)) {
dependArray(value)
}
}
}
return value
},
})

Dep.target的作用是在这里还看不出来 我们往下watcher就会明白了

Watcher

现在有了(观察者)数据劫持和依赖收集,那自然少不了订阅者啦,Watcher核心代码如下
精简版代码如下:

1
2
3
4
5
6
7
8
9
10
11
12
13
14
15
16
17
18
19
20
21
22
23
24
25
26
27
28
29
30
31
32
33
34
35
36
37
38
39
40
41
42
43
44
45
46
47
48
49
50
51
52
var Watcher = function Watcher (
vm,
expOrFn,
cb,
options,
isRenderWatcher
) {
this.vm = vm;
if (isRenderWatcher) {
vm._watcher = this;
}
vm._watchers.push(this);
// options
if (options) {
this.deep = !!options.deep;
this.user = !!options.user;
this.lazy = !!options.lazy;
this.sync = !!options.sync;
this.before = options.before;
} else {
this.deep = this.user = this.lazy = this.sync = false;
}
this.cb = cb;
this.id = ++uid$2; // uid for batching
this.active = true;
this.dirty = this.lazy; // for lazy watchers
this.deps = [];
this.newDeps = [];
this.depIds = new _Set();
this.newDepIds = new _Set();
this.expression = expOrFn.toString();
// parse expression for getter
// render-watcher
if (typeof expOrFn === 'function') {
this.getter = expOrFn;
} else {
// 在组件内使用watch监听
this.getter = parsePath(expOrFn);
if (!this.getter) {
this.getter = noop;
warn(
"Failed watching path: \"" + expOrFn + "\" " +
'Watcher only accepts simple dot-delimited paths. ' +
'For full control, use a function instead.',
vm
);
}
}
this.value = this.lazy
? undefined
: this.get();
};

以上是Watcher的构造函数 重点关注expOrFn和isRenderWatcher这两个参数
先介绍一下Watcher是个啥吧
有三种Watcher

  1. computed-watcher: 定义在钩子computed,每个计算属性都会通过initComputed生成一个watcher
  2. normal-watcher: 在钩子watch里定义的,每个watch都会通过initWatch调用vm.$watch生成一个watcher
  3. render-watcher: 组件在调用$mount时会实例化一个组件级别的watcher 用于组件内部的更新

当然执行顺序也是 computed-watcher -> normal-watcher -> render-watcher 这样能保证每次更新时computed的属性是及时的
看到构造函数最后执行了this.get() 这个方法就是依赖收集的关键 我们会从上面三种watcher的角度分别阐述
先看get代码:

1
2
3
4
5
6
7
8
9
10
11
12
13
14
15
16
17
18
19
20
21
22
23
Watcher.prototype.get = function get () {
pushTarget(this);
var value;
var vm = this.vm;
try {
value = this.getter.call(vm, vm);
} catch (e) {
if (this.user) {
handleError(e, vm, ("getter for watcher \"" + (this.expression) + "\""));
} else {
throw e
}
} finally {
// "touch" every property so they are all tracked as
// dependencies for deep watching
if (this.deep) {
traverse(value);
}
popTarget();
this.cleanupDeps();
}
return value
};

看到pushTarget和popTarget是不是很眼熟,这不就是Dep里提供的两个方法嘛
这两个方法的作用就是形成一个闭包 value = this.getter.call(vm, vm)
这一步会触发被劫持数据的get钩子 此时Dep.target就是当前的watcher实例
所有触发getter的对象都会触发dep.depend() 如下:

1
2
3
4
5
depend () {
if (Dep.target) {
Dep.target.addDep(this)
}
}

进而触发当前watcher的addDep方法:

1
2
3
4
5
6
7
8
9
10
addDep (dep) {
const id = dep.id
if (!this.newDepIds.has(id)) {
this.newDepIds.add(id)
this.newDeps.push(dep)
if (!this.depIds.has(id)) {
dep.addSub(this)
}
}
}

最后在调用dep.addSub将数据依赖到的watcher收集到dep.subs里了,等该数据的setter被触发后再调用dep.notify()通知所有订阅者要更新视图啦

实际上在一个vue组件初始化的过程中会有以下几个操作 这里只讲本篇用到的hah

初始化computed 通过initComputed给每个计算属性生成对应的Watcher
  1. 此时expOrFn作为参数传进来是个function 并且isRenderWatcher为false 在构造函数会直接赋值给this.getter 在需要用到的时候会调用get方法获取到value
  2. 但是这类Watcher有个特点:当计算属性依赖于其他数据时,属性并不会立即重新计算,只有之后其他地方需要读取属性的时候,它才会真正计算,即具备lazy(懒计算)特性
  3. 实际上,在组件初始化的过程中,会把computed的watcher存在vm._computedWatchers里,真正用到的时候才会将依赖存进dep 详情代码请看defineComputed
如果钩子函数watch存在监听 会调用initWatch -> createWactehr -> vm.$watch对每个监听创建对应的watcher
  1. 此时expOrFn是string类型 会执行this.getter = parsePath(expOrFn) parsePath代码如下 这个方法的目的就是通过watch的名字循环的触发数据的getter达到依赖收集的作用
  2. 其他逻辑和computed一致
1
2
3
4
5
6
7
8
9
10
11
12
13
export function parsePath (path: string): any {
if (bailRE.test(path)) {
return
}
const segments = path.split('.')
return function (obj) {
for (let i = 0; i < segments.length; i++) {
if (!obj) return
obj = obj[segments[i]]
}
return obj
}
}
组件在真正渲染之前会调用$mount 该步骤的目的是生成vnode 并且给每个组件生成一个render-watcher作为内部更新的方法 代码如下:
  1. 此时expOrFn是一个函数updateComponent 如下
  2. updateComponent负责组件的编译 编译过程中替换模板内的变量是也会触发变量的getter,从而达到收集依赖的作用,这里牵扯到compile部分,不多讲 抽时间单独介绍
  3. 其他逻辑与上面一致
1
2
3
4
5
6
7
8
9
10
11
12
13
14
15
16
17
18
19
20
21
22
23
24
25
26
27
28
29
30
31
32
33
34
35
36
37
38
39
40
41
42
43
44
45
46
47
48
49
50
51
52
53
54
55
56
57
58
59
60
61
62
63
64
65
66
67
68
69
70
71
72
73
function mountComponent (
vm,
el,
hydrating
) {
vm.$el = el;
if (!vm.$options.render) {
vm.$options.render = createEmptyVNode;
{
/* istanbul ignore if */
if ((vm.$options.template && vm.$options.template.charAt(0) !== '#') ||
vm.$options.el || el) {
warn(
'You are using the runtime-only build of Vue where the template ' +
'compiler is not available. Either pre-compile the templates into ' +
'render functions, or use the compiler-included build.',
vm
);
} else {
warn(
'Failed to mount component: template or render function not defined.',
vm
);
}
}
}
callHook(vm, 'beforeMount');

var updateComponent;
/* istanbul ignore if */
if (config.performance && mark) {
updateComponent = function () {
var name = vm._name;
var id = vm._uid;
var startTag = "vue-perf-start:" + id;
var endTag = "vue-perf-end:" + id;

mark(startTag);
var vnode = vm._render();
mark(endTag);
measure(("vue " + name + " render"), startTag, endTag);

mark(startTag);
vm._update(vnode, hydrating);
mark(endTag);
measure(("vue " + name + " patch"), startTag, endTag);
};
} else {
updateComponent = function () {
vm._update(vm._render(), hydrating);
};
}

// we set this to vm._watcher inside the watcher's constructor
// since the watcher's initial patch may call $forceUpdate (e.g. inside child
// component's mounted hook), which relies on vm._watcher being already defined
new Watcher(vm, updateComponent, noop, {
before: function before () {
if (vm._isMounted && !vm._isDestroyed) {
callHook(vm, 'beforeUpdate');
}
}
}, true /* isRenderWatcher */);
hydrating = false;

// manually mounted instance, call mounted on self
// mounted is called for render-created child components in its inserted hook
if (vm.$vnode == null) {
vm._isMounted = true;
callHook(vm, 'mounted');
}
return vm
}

最后上一张图 帮助理解

reactive

参考链接

Vue 数据响应式原理

其他链接

看了数据响应这块的你 也可以看看Vue2.x关于patch的解读哦

  1. vue-patch